
我经常会捡到一些 ARM、MIPS 架构的板子,因为性能很捉急,所以一般不会直接用这些板子编译要用到的程序,而是在性能更好的机器上交叉编译,即在 A 架构的机器下构建 B 架构的程序。
传统的 C/C++ 程序的交叉编译需要交叉编译工具链(编译器、链接器、标准库…),还得配置构建工具使用这套工具链,总的来说非常复杂。不过现在我们有了 Zig,给 C/C++ 程序配置交叉编译就像 Go 一样简单。
直接使用 Zig 交叉编译单文件程序
先来个开胃小菜,演示一下 Zig 的命令行界面。
这是一个标准的 C 语言 Hello World:
// Filename - hello_world.c
#include <stdio.h>

int main(void) {
	printf("Hello world!");
	return 0;
}
使用 zig cc 编译到 MIPS:
zig cc -target mips-linux-musleabi hello_world.c -o hello_mips来看看编译产物:
$ file hello_mips
hello_mips: ELF 32-bit MSB executable, MIPS, MIPS32 rel2 version 1 (SYSV), statically linked, with debug_info, not stripped
对的,就这么简单!Zig 不仅集成了编译器,还集成了链接器、AR、Ranlib 和标准库。你可以用 zig targets 查看当前支持的平台,并轻松的在他们之间切换:
$ zig targets
.{
    .arch = .{
        "amdgcn",
        "arc",
        "arm",
        "armeb",
        "thumb",
        "thumbeb",
        "aarch64",
        "aarch64_be",
...
配置构建系统使用 Zig
常见的项目一般都会使用构建系统构建项目,来看看如何在两种常见的构建系统中使用 Zig。
CMake
这里拿 fastfetch 举例子,因为相对比较简单 (绝对不是我蠢玩不明白 CMake 然后把自己的项目迁到了 Meson) 。
老样子,先把 fastfetch 拖下来,同时把 zig-cross 也拖下来,等下会用到。
git clone https://github.com/fastfetch-cli/fastfetch
git clone https://github.com/mrexodia/zig-cross.git
进入 fastfetch 的目录里,然后把 zig-cross 里的 /cmake 目录和某个 <xxx>.cmake 复制到这个目录里。
cd fastfetch
cp -rf ../zig-cross/cmake ../zig-cross/<xxx>.cmake .
然后重命名 <xxx>.cmake 为你期望的平台,例如:
cp <xxx>.cmake mipsel-linux-musleabi.cmake然后生成构建目录,尝试构建一下:
cmake -B build-mipsel -G Ninja --toolchain mipsel-linux-musleabi.cmake
cmake --build build-mipsel
然后不出所料… 报错了:
[1/224] Building C object CMakeFiles/libfastfetch.dir/src/common/format.c.o
FAILED: CMakeFiles/libfastfetch.dir/src/common/format.c.o
/home/leo/fastfetch/cmake/zig-cc -target mipsel-linux-musleabi -DFF_HAVE_DBUS=1 -DFF_HAVE_ELF=1 -DFF_HAVE_GLOB=1 -DFF_HAVE_LIBZFS=1 -DFF_HAVE_LINUX_VIDEODEV2=1 -DFF_HAVE_LINUX_WIRELESS=1 -DFF_HAVE_PIPE2 -DFF_HAVE_STATX -DFF_HAVE_THREADS=1 -DFF_HAVE_TIMEDJOIN_NP=1 -DFF_HAVE_UTMPX=1 -DFF_HAVE_WCWIDTH -DFF_HAVE_WORDEXP=1 -DFF_HAVE_ZLIB=1 -DFF_PACKAGES_DISABLE_LIST=FF_PACKAGES_FLAG_WINGET_BIT -D_ATFILE_SOURCE -D_FILE_OFFSET_BITS=64 -D_GNU_SOURCE -D_TIME_BITS=64 -D_XOPEN_SOURCE -D__STDC_WANT_LIB_EXT1__ -I/usr/include/dbus-1.0 -I/usr/lib/x86_64-linux-gnu/dbus-1.0/include -I/usr/include -I/home/leo/fastfetch/build-mipsel -I/home/leo/fastfetch/src -Wall -Wextra -Wconversion -Werror=uninitialized -Werror=return-type -Werror=vla -Werror=incompatible-pointer-types -Werror=implicit-function-declaration -Werror=int-conversion -O2 -g -DNDEBUG -std=gnu11 -MD -MT CMakeFiles/libfastfetch.dir/src/common/format.c.o -MF CMakeFiles/libfastfetch.dir/src/common/format.c.o.d -o CMakeFiles/libfastfetch.dir/src/common/format.c.o -c /home/leo/fastfetch/src/common/format.c
In file included from /home/leo/fastfetch/src/common/format.c:1:
In file included from /home/leo/fastfetch/src/fastfetch.h:5:
/usr/include/stdint.h:26:10: fatal error: 'bits/libc-header-start.h' file not found
   26 | #include <bits/libc-header-start.h>
      |          ^~~~~~~~~~~~~~~~~~~~~~~~~~
1 error generated.
你可以看到编译器在尝试使用主机的 libc,which is bad。很明显是由于 -I/usr/include 这个选项,但是我没找到是啥把这玩意儿带进来的,摸索出来的解决办法是关掉所有依赖:
#####################
# Configure options #
#####################

include(CMakeDependentOption)

cmake_dependent_option(ENABLE_VULKAN "Enable vulkan" OFF "LINUX OR APPLE OR FreeBSD OR OpenBSD OR NetBSD OR WIN32 OR ANDROID OR SunOS OR Haiku OR GNU" OFF)
...
下面的 Zlib 也要关掉。
option(ENABLE_ZLIB "Enable zlib" OFF)再 build 一遍,还是报错了233:
[39/223] Building C object CMakeFiles/libfastfetch.dir/src/detection/version/version.c.o
FAILED: CMakeFiles/libfastfetch.dir/src/detection/version/version.c.o
/home/leo/fastfetch/cmake/zig-cc -target mipsel-linux-musleabi -DFF_HAVE_GLOB=1 -DFF_HAVE_LINUX_VIDEODEV2=1 -DFF_HAVE_LINUX_WIRELESS=1 -DFF_HAVE_PIPE2 -DFF_HAVE_STATX -DFF_HAVE_UTMPX=1 -DFF_HAVE_WCWIDTH -DFF_HAVE_WORDEXP=1 -DFF_PACKAGES_DISABLE_LIST=FF_PACKAGES_FLAG_WINGET_BIT -D_ATFILE_SOURCE -D_FILE_OFFSET_BITS=64 -D_GNU_SOURCE -D_TIME_BITS=64 -D_XOPEN_SOURCE -D__STDC_WANT_LIB_EXT1__ -I/home/leo/fastfetch/build-mipsel -I/home/leo/fastfetch/src -Wall -Wextra -Wconversion -Werror=uninitialized -Werror=return-type -Werror=vla -Werror=incompatible-pointer-types -Werror=implicit-function-declaration -Werror=int-conversion -O2 -g -DNDEBUG -std=gnu11 -MD -MT CMakeFiles/libfastfetch.dir/src/detection/version/version.c.o -MF CMakeFiles/libfastfetch.dir/src/detection/version/version.c.o.d -o CMakeFiles/libfastfetch.dir/src/detection/version/version.c.o -c /home/leo/fastfetch/src/detection/version/version.c
/home/leo/fastfetch/src/detection/version/version.c:74:20: error: expansion of date or time macro is not reproducible [-Werror,-Wdate-time]
   74 |     .compileTime = __DATE__ ", " __TIME__,
      |                    ^
/home/leo/fastfetch/src/detection/version/version.c:74:34: error: expansion of date or time macro is not reproducible [-Werror,-Wdate-time]
   74 |     .compileTime = __DATE__ ", " __TIME__,
      |                                  ^
2 errors generated.
这似乎是因为 Zig 默认的警告开的比较高,很多警告都会被当成错误,手动忽略即可:
echo 'add_compile_options(-Wno-error=date-time)' >> mipsel-linux-musleabi.cmake总算成功了:
$ file build-mipsel/flashfetch
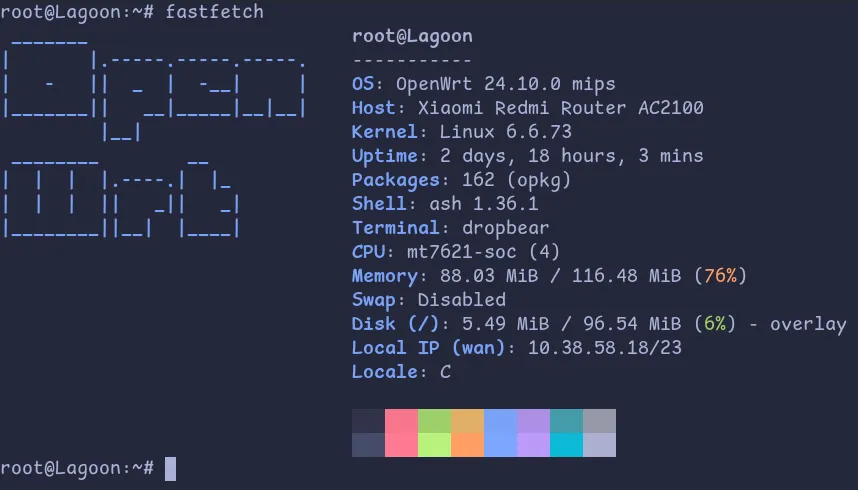
build-mipsel/flashfetch: ELF 32-bit LSB executable, MIPS, MIPS32 rel2 version 1 (SYSV), statically linked, with debug_info, not stripped上实机跑跑看:
Meson
Meson 是一个类似于 CMake 的构建系统,不过相对简单很多。我自己的项目用到了 Meson,把他 clone 下来看看:
git clone --depth 1 https://github.com/diredocks/zzz.git
cd zzz
你会发现有个 /cross 目录,里面的文件就相当于 CMake 的交叉编译配置,随便打开一个看看:
[binaries]
c = ['zig', 'cc']
cpp = ['zig', 'c++']
ar = ['zig', 'ar']
ranlib = ['zig', 'ranlib']
lib = ['zig', 'lib']
dlltool = ['zig', 'dlltool']
pkg-config = 'pkg-config'

[host_machine]
system = 'linux'
cpu_family = 'mips'
cpu = 'mipsel'
endian = 'little'

[built-in options]
c_args = ['-target', 'mipsel-linux-musleabi']
c_link_args = ['-target', 'mipsel-linux-musleabi']
其他目标平台的也同理,更改 -target 即可。
要开始构建,使用以下命令:
meson setup build-mipsel --cross-file cross/mipsel-linux-musleabi.toml
meson compile -C build-mipsel
又 TM 报错了,这次是我们依赖的 pcap 找不到定义:
[2/15] Compiling C object zzz.p/src_main.c.o
FAILED: zzz.p/src_main.c.o
zig cc -Izzz.p -I. -I.. -I../include -I../src -I/usr/include/dbus-1.0 -I/usr/lib/x86_64-linux-gnu/dbus-1.0/include -I/usr/include/libnl3 -fdiagnostics-color=always -D_FILE_OFFSET_BITS=64 -Wall -Winvalid-pch -std=gnu23 -O3 -target mipsel-linux-musleabi -MD -MQ zzz.p/src_main.c.o -MF zzz.p/src_main.c.o.d -o zzz.p/src_main.c.o -c ../src/main.c
In file included from ../src/main.c:8:
../include/utils/device.h:5:10: fatal error: 'pcap.h' file not found
    5 | #include <pcap.h>
      |          ^~~~~~~~
1 error generated.
交叉编译需要程序的依赖库也是目标平台版本的,所以我们现在得去自己编译 libpcap:
# 这里假定你已经下好了 libpcap 的源码包
CC="zig cc -target mipsel-linux-musleabi" \
AR="zig ar" \
RANLIB="zig ranlib" \
./configure --host=x86_64-linux --with-pcap=linux --prefix=$(pwd)

make -j$(nproc) && make install
export PCAP_PATH=$(pwd)/lib/pkgconfig/
回到我们的项目目录,Meson 会调用 pkg-config 寻找 pcap,所以 pkg-config 配置一下查找路径:
export PKG_CONFIG_LIBDIR=$PCAP_PATH然后重新生成构建文件,并构建:
meson setup --wipe build-mipsel --cross-file cross/mipsel-linux-musleabi.toml
meson compile -C build-mipsel
总算好了:
$ file build-mipsel/zzz
build-mipsel/zzz: ELF 32-bit LSB executable, MIPS, MIPS32 rel2 version 1 (SYSV), dynamically linked, interpreter /lib/ld-musl-mipsel-sf.so.1, with debug_info, not stripped
小结
用 Go 的理由又少了一个,可能我应该多赚钱买点高配垃圾子。